Sub PasswordBreaker()
    'Breaks worksheet password protection.
    Dim i As Integer, j As Integer, k As Integer
    Dim l As Integer, m As Integer, n As Integer
    Dim i1 As Integer, i2 As Integer, i3 As Integer
    Dim i4 As Integer, i5 As Integer, i6 As Integer
    On Error Resume Next
    For i = 65 To 66: For j = 65 To 66: For k = 65 To 66
    For l = 65 To 66: For m = 65 To 66: For i1 = 65 To 66
    For i2 = 65 To 66: For i3 = 65 To 66: For i4 = 65 To 66
    For i5 = 65 To 66: For i6 = 65 To 66: For n = 32 To 126
        ActiveSheet.Unprotect Chr(i) & Chr(j) & Chr(k) & _
        Chr(l) & Chr(m) & Chr(i1) & Chr(i2) & Chr(i3) & _
        Chr(i4) & Chr(i5) & Chr(i6) & Chr(n)
        If ActiveSheet.ProtectContents = False Then
            MsgBox "One usable password is " & Chr(i) & Chr(j) & _
            Chr(k) & Chr(l) & Chr(m) & Chr(i1) & Chr(i2) & _
            Chr(i3) & Chr(i4) & Chr(i5) & Chr(i6) & Chr(n)
            Exit Sub
        End If
        Next: Next: Next: Next: Next: Next
        Next: Next: Next: Next: Next: Next
End Sub
to unlock password protected workbooks:
Line 12, replace "ActiveSheet" with "ThisWorkbook"
Line 15, replace "ActiveSheet.ProtectContents" with "ThisWorkbook.ProtectStructure"
-
Installer script
cd ~
wget https://raw.githubusercontent.com/adafruit/Raspberry-Pi-Installer-Scripts/master/adafruit-pitft.sh
chmod +x adafruit-pitft.sh
sudo ./adafruit-pitft.sh
-
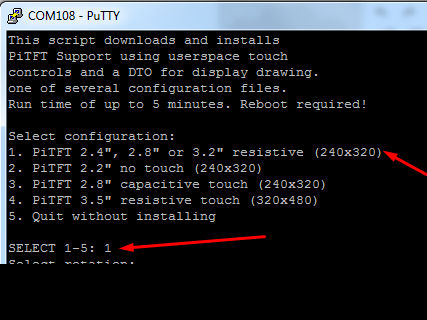
PiTFT Selection
Once you run it you will be presented with menus for configuration.
For the 2.4", 2.8" and 3.2" PiTFT with resistive touchscreen overlay select #1
-
PiTFT as Text Console
If you want the PiTFT to act as a text console, select YES to "Would you like the console to appear on the PiTFT display" choose NO to boot into GUI.
-
Reboot.
Reference: https://learn.adafruit.com/adafruit-pitft-28-inch-resistive-touchscreen-display-raspberry-pi?view=all
PS.
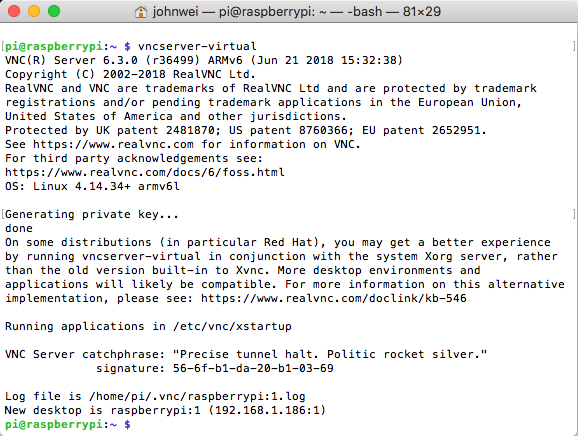
When 2.8" touch screen installed, the display driver will override these settings, so that 320×480 resolution is being used instead, both by X11 and RealVNC. By switching RealVNC into virtual mode, it is possible to start a virtual desktop at a higher resolution:
pi@raspberrypi:~ $ vncserver-virtual
Adaptor design
Wiring

Software
See the hardware part to setup serial communication.
Get serial communication software like coolterm or picocom.
Depending on your computer select the right serial port like : /dev/ttyUSB0, /dev/tty.usbserial (type ls /dev/ in a terminal)
Setup 19200 baud and default 0D 0A line feed is fine.
You can start with AT The modem will answer : OK
Send a message
AT&K0
AT+SBDWT=Hello
AT+SBDIX
sudo nano ~/.config/pcmanfm/LXDE-pi/pcmanfm.conf
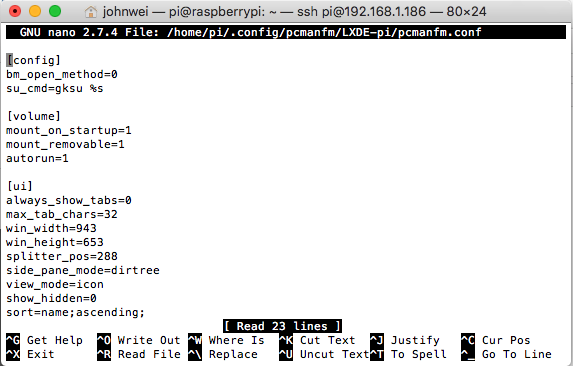 and change the from:
[volume]
mount_on_startup=1
mount_removable=1
to
[volume]
mount_on_startup=0
mount_removable=0

Modified TinyGPSPlus for more precise location data.
https://github.com/johntcw/TinyGPSPlus
Discussions:
https://forum.arduino.cc/index.php?topic=338822.0
https://forum.arduino.cc/index.php?topic=96625.0